ADVERTISEMENT

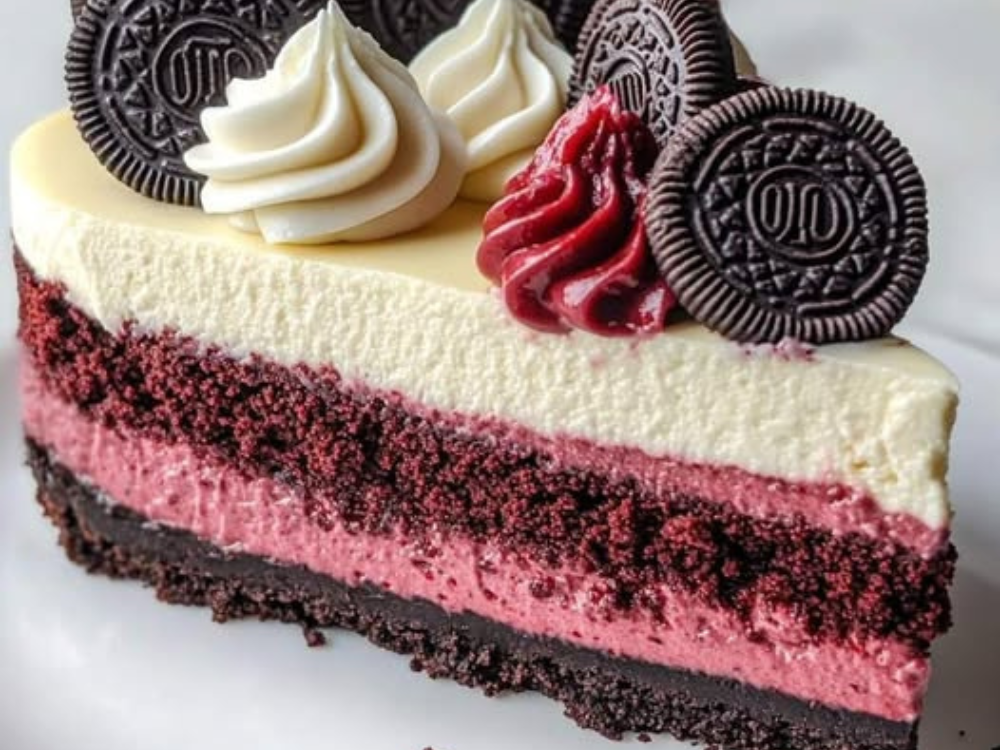
Here’s a recipe for Oreo Red Velvet Cheesecake a rich, creamy, and decadent dessert that combines the classic flavors of red velvet and creamy cheesecake with a crunchy Oreo crust. It’s a stunning dessert that’s perfect for any special occasion, especially during the holidays!
Oreo Red Velvet Cheesecake Recipe
Ingredients:
For the Oreo Crust:
- 1 1/2 cups Oreo cookie crumbs (about 18 Oreo cookies)
- 1/4 cup unsalted butter, melted
For the Red Velvet Cheesecake:
- 3 (8 oz) packages cream cheese, softened
- 1 cup granulated sugar
- 1 tsp vanilla extract
- 2 large eggs
- 1/2 cup sour cream
- 1/4 cup heavy cream
- 1 1/2 tbsp red food coloring (gel works best)
- 1 1/2 tbsp all-purpose flour
- 1/2 cup buttermilk
- 1 tsp white vinegar
- 1/2 tsp baking soda
For the Oreo Cheesecake Filling:
- 1/2 cup heavy cream
- 1 cup white chocolate chips (or chopped white chocolate)
- 8 Oreos, roughly chopped
For the Decoration (optional):
- Whipped cream
- Crushed Oreos
- Fresh berries (optional)
Instructions:
1. Make the Oreo Crust:
- Preheat your oven to 325°F (163°C).
- In a medium bowl, combine the Oreo cookie crumbs and melted butter. Stir until the crumbs are well-coated.
- Press the mixture into the bottom of a 9-inch springform pan to form a crust. Use the back of a spoon to compact it tightly.
- Bake the crust in the preheated oven for 8-10 minutes, then remove and allow it to cool while you prepare the cheesecake filling.
2. Make the Red Velvet Cheesecake Batter:
- In a large bowl, beat the softened cream cheese with an electric mixer until smooth and creamy.
- Add the sugar and vanilla extract, and beat until well combined.
- Add the eggs, one at a time, mixing well after each addition.
- In a small bowl, combine the baking soda and white vinegar, then stir it into the batter.
- Add the sour cream, heavy cream, and red food coloring, mixing until fully incorporated. The batter should have a vibrant red color.
- Gradually add the flour and buttermilk, mixing until smooth and well-combined.
3. Assemble the Cheesecake:
- Pour the red velvet cheesecake batter over the cooled Oreo crust, spreading it out evenly.
- Tap the pan gently on the counter to remove any air bubbles.
- Bake the cheesecake at 325°F (163°C) for 45-55 minutes, or until the center is slightly set but still a little jiggly. The edges should be firm and slightly pulled away from the pan.
- Turn off the oven, crack the oven door slightly, and let the cheesecake cool in the oven for about 1 hour. Then, remove it from the oven and cool completely at room temperature.
- Refrigerate the cheesecake for at least 4 hours or overnight to set.
4. Make the Oreo Cheesecake Filling:
- In a small saucepan, heat the heavy cream over medium heat until it begins to steam (but not boil).
- Pour the heated cream over the white chocolate chips in a separate bowl. Let it sit for 1-2 minutes, then stir until the white chocolate is completely melted and smooth.
- Stir in the chopped Oreos and let the mixture cool slightly.
5. Assemble the Oreo Red Velvet Cheesecake:
- Once the cheesecake has fully set and cooled, spread the Oreo cheesecake filling evenly over the top of the cheesecake.
- Use a spatula to smooth it out and create a decorative swirl if desired.
6. Decorate and Serve:
- If desired, top the cheesecake with whipped cream, crushed Oreos, and fresh berries for an extra festive touch.
- Slice and serve chilled.
Tips:
- To make this cheesecake even more decadent, drizzle some chocolate ganache over the top.
- If you prefer a no-bake cheesecake, you can substitute the red velvet cheesecake filling with a no-bake cream cheese filling. Just be sure to refrigerate it long enough to set.
- This cheesecake is best served after it’s fully chilled, as the flavors and texture develop over time.
This Oreo Red Velvet Cheesecake is a showstopper dessert that combines the best of red velvet and Oreo flavors, making it perfect for your next celebration!
ADVERTISEMENT