ADVERTISEMENT

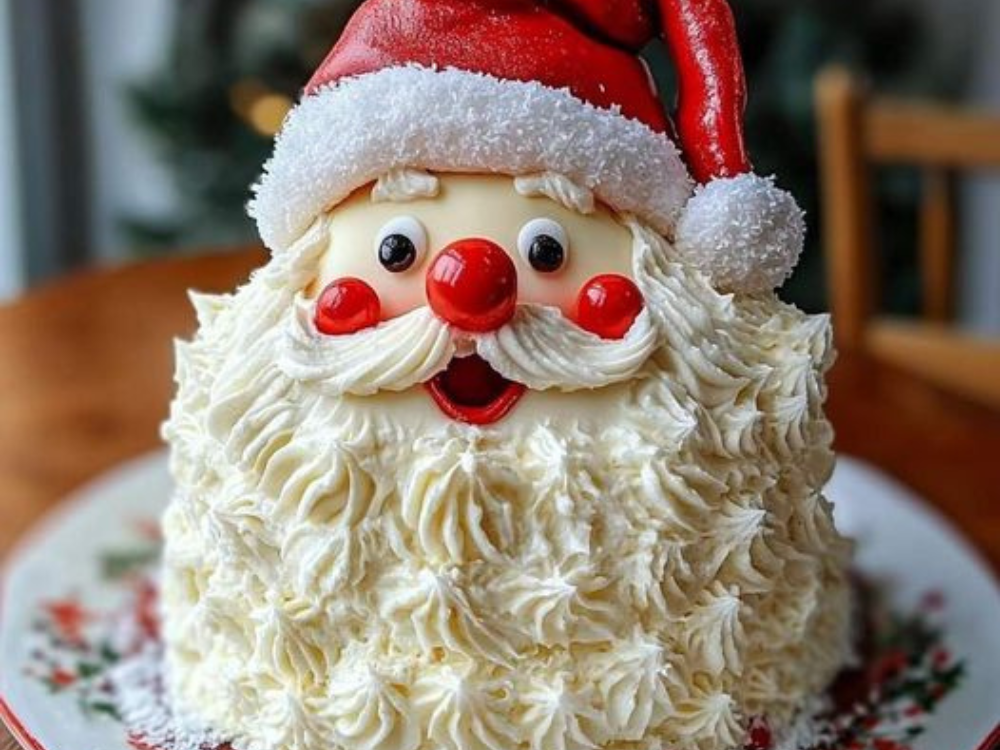
This Santa Claus Cake is the ultimate festive centerpiece for your holiday celebrations! With a fun, jolly design featuring Santa’s face, this cake is sure to bring smiles to everyone at your holiday table. Whether you’re celebrating Christmas with family, friends, or at a party, this cake will add a playful and delicious touch to the festivities!
Ingredients
For the Cake:
- 2 ½ cups all-purpose flour
- 2 ½ teaspoons baking powder
- ½ teaspoon salt
- 1 ¼ cups unsalted butter (softened)
- 1 ½ cups granulated sugar
- 4 large eggs
- 1 teaspoon vanilla extract
- 1 cup whole milk
- Red gel food coloring (optional, for the Santa suit)
For the Buttercream Frosting:
- 1 cup unsalted butter (softened)
- 4 cups powdered sugar
- 2 teaspoons vanilla extract
- 2 tablespoons heavy cream or milk
- Red gel food coloring
- Black food coloring (optional, for eyes and eyebrows)
- Pink food coloring (for the cheeks)
- A pinch of salt (to balance the sweetness)
For the Decorations:
- Mini marshmallows (for the beard)
- Large marshmallows (for the pom-pom on Santa’s hat)
- Red and white sprinkles (for extra decoration)
- Chocolate chips or black fondant (for the eyes and mouth)
- White fondant (for the hat trim)
- Pink frosting (for the cheeks)
Instructions
Step 1: Make the Cake
- Preheat the Oven:
Preheat your oven to 350°F (175°C). Grease and flour two round cake pans (8-inch or 9-inch) and set aside. - Prepare the Dry Ingredients:
In a medium bowl, whisk together the flour, baking powder, and salt. - Cream the Butter and Sugar:
In a large mixing bowl, cream the softened butter and sugar together until light and fluffy, about 3-4 minutes. - Add the Eggs and Vanilla:
Beat in the eggs one at a time, followed by the vanilla extract. - Add Dry Ingredients & Milk:
Gradually add the dry ingredients to the wet mixture, alternating with the milk. Start and finish with the dry ingredients, mixing until just combined. - Add Food Coloring (Optional):
If you want to create a red Santa suit effect, add a few drops of red gel food coloring to the batter and mix until the desired shade is reached. - Bake the Cakes:
Pour the batter into the prepared cake pans and bake for 25-30 minutes, or until a toothpick inserted into the center comes out clean. Allow the cakes to cool in the pans for 10 minutes before transferring them to a wire rack to cool completely.
Step 2: Make the Buttercream Frosting
- Beat the Butter:
Beat the softened butter on medium speed until smooth and creamy. - Add Powdered Sugar:
Gradually add the powdered sugar, one cup at a time, mixing well after each addition. - Add Flavor and Consistency:
Add the vanilla extract, salt, and heavy cream, and continue to beat until fluffy and smooth. - Color the Frosting:
Divide the frosting into several portions. Color one portion red for Santa’s suit, one portion pink for his cheeks, and leave the rest white for his face, beard, and hat. - Optional: Black Food Coloring:
If you want to add details like Santa’s eyes and eyebrows, color a small portion of the frosting black.
Step 3: Assemble the Santa Claus Cake
- Layer the Cakes:
Once the cakes are completely cool, place the first cake layer on a cake stand or plate. Spread a layer of white frosting over the top. Place the second cake layer on top. - Create Santa’s Face:
Using a spatula, frost the entire cake with white frosting to form Santa’s face. Smooth out the frosting to create an even base. - Santa’s Hat:
Frost the top of the cake with red frosting to create Santa’s hat. Use white frosting along the bottom edge of the hat to create a fluffy trim. You can use white fondant or extra white frosting for the hat’s pom-pom at the top. - Santa’s Beard and Mustache:
For the beard, pipe mini marshmallows around the bottom of Santa’s face. For the mustache, use the same method but create a smaller shape just above the beard. - Add the Eyes and Nose:
Use black food coloring or chocolate chips to create Santa’s eyes. For the nose, you can pipe a small pink dot of frosting. - Add the Cheeks:
Pipe a small amount of pink frosting on each side of Santa’s face to give him rosy cheeks.
Step 4: Final Touches
- Decorate the Hat and Face:
Add white fondant or extra white frosting to the hat trim for a fluffy, snowy look. You can also add additional sprinkles or edible glitter for extra holiday sparkle. - Serve & Enjoy:
Once everything is decorated, step back and admire your adorable Santa Claus cake! It’s ready to be served at your next festive gathering or celebration!
Tips for Success:
- Cake Color: If you prefer, you can make the entire cake white and simply decorate with red frosting for Santa’s suit, rather than coloring the cake batter itself.
- Frosting Consistency: Make sure your buttercream is thick enough to pipe, especially for the beard, hat trim, and facial details. If needed, chill the frosting in the fridge for 15 minutes before using it.
- Cake Decorating: Get creative with the cake decorations! You can even use fondant for more defined shapes if you’re comfortable with it.
This Adorable Santa Claus Cake will be the star of your holiday table and is sure to spread plenty of Christmas cheer! With its charming design, festive colors, and delicious flavors, this cake will bring joy to your celebrations.
ADVERTISEMENT